Sunday, February 21, 2010

Sweet Needle Felted Bunnies - free tutorial!

We enjoyed the most beautiful taste of spring in Maine this weekend. After a glorious walk on the beach we stopped at the pet store on our way home. To Celias absolute delight we stumbled upon a pen of baby bunnies. There was no chance of us adding to our menagerie, but our short visit was the perfect inspiration for this needle felt tutorial. If you haven't tried needle felting please do give it a second look, it's incredibly accessible. All you need is some wool roving and a felting needle to get started. I've yet to find a better medium for quickly making miniature furry animals. These low maintenance bunnies will be so popular you'll need to felt a whole litter in time for Easter!

Materials
Assorted wool roving: white, tan, grey and small amounts of black and dark brown for the eyes.
Felting needle (there is no substitute for the genuine barbed needle)
Piece of rigid foam insulation or a foam felting mat.

Finished size: 2 1/2" x 2 1/2"

1. Starting with the body, roll the main color into a tight ball as if you were forming a bead. Repeatedly poke it on all sides to stabilize the roving. Wrap additional strands of roving around the ball to increase the size. Be sure to needle felt it on all sides after each addition. Add more roving to one end so that the ball becomes an egg shape, approximately 2" long and 1" thick at the widest point.

2. To make the hind legs spiral the roving into a circle (1" in diameter). Fold the roving end several times to make a paw shape that extends 1/2" out from the leg. Add a couple more pieces of roving to thicken both the leg and the paw. Repeat the process to make a second leg.


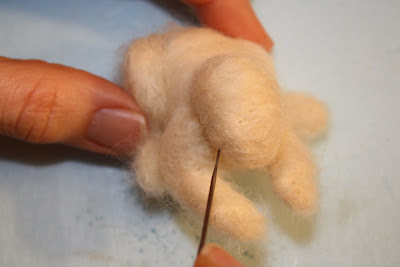
3. Position the legs on either side of the body. Repeatedly poke the outside edge of each leg with your felting needle to anchor them body, let the paws fall free.

4. Fold a new piece of roving several times to make a 1 1/2" long arm. Wrap the folded roving with a second strand and then needle felt it to compress the fibers. Create a bent elbow in the arm by folding it and then needle felt the folded area. Repeat the process to make a second arm. Position an arm on either side of the body. Needle felt the top shoulder portion of of the arms to the body, let the paw ends fall free.  


5.  Create the head as you did the body starting with a tight bead shape. Wrap and needle felt additional strands of roving around the head until it measures 1"x 1". Position the head above the front paws and needle felt directly through the rabbits face to attach it to the small end of the body. Make additional pokes around the neck to insure it's properly connected.


6. Stay with me your bunny is starting to get cute... We're on to the ears, fold a piece of roving as you did the arms so that its an 1 1/2" long. Needle felt it and if necessary add another layer roving. My ears tend to get wide, I fold them in half lengthwise and needle felt the folded layers together. Create a second ear, and needle felt the base of each ear to the top of the head.

7. Take a small strand of beige roving and spiral it into a spot, needle felt it to one side of the face. Make a larger beige spot for the bunnies back. Roll the tiniest pinch of dark brown roving for the eyes and nose and use your needle to poke them directly into the face. The more you poke them the smaller they appear as they become incorporated into the head.


8. The final step is to roll up a loose ball of white roving for a tail and poke it directly into the back of the body.


Enjoy experimenting with different colors and ear positions. Here's 'hopping' we all get to enjoy warmer weather and longer days filled with sunshine!

Wednesday, February 10, 2010

Needle felted hearts and raspberry square recipe

Last night I enjoyed a wonderful evening sharing needle felting techniques with creative women at Art Mind and Soul Studios in the Fort Andross mill. This renovated brick mill sits beside the Androscoggin river in Brunswick Maine. The interior has been beautifully renovated into office and artist studios, the building is also home to restaurants and antique shops. Art Mind and Soul recently opened their doors as a center for the visual arts community. It's a wonderful place to hold workshops, create for an hour or two or rent a small studio space.

My approach to teaching this needle felting class was to hand everyone a kit full of supplies and impart as much technical knowledge as I could. I demonstrated wet and dry felting techniques along with flat and three dimensional construction. The joy of needle felting is that you immediately start poking fibers together with a felting needle. I was thrilled with the originality of the finished projects. They were stunningly beautiful raised designs abstract to illustrative on wool felt rectangles, charming three dimensional hearts and even a few white bunnies.

If you missed out on this workshop, don't fret I'll offer it again soon with a different theme and new construction techniques. I'm looking forward to sharing Polymer clay millefliori beads and stamped charms on Feb 23 and Pysanky egg dying on March 28. If your a parent of young children please click the sidebar link to find a listing of my inexpensive family workshops also held at Art Mind and Soul studios.


The other hit last night was my mums' raspberry coconut bar recipe named 'Louise Cake'
My parents are British, my mother kindly converted the amounts from weighted quantities. For the sake of the workshop I doubled the recipe and baked the bars in a 11"x13" metal brownie pan, I needed 35 minutes to brown the crust.

Preheat the oven to 350

Cream 1/2 cup of butter and 2T +2t of sugar together.
Add 2 egg yolks to the creamed butter and sugar.

Stir in 1cup +1T of flour and 1t of baking powder.
Press the crust mixture into the bottom of a greased 7"x11" baking pan.
Generously spread raspberry jam over the 'crust'.
Whisk the 2 egg whites until they're stiff.
Fold in 2/3 cup of sugar and 1 cup of sweetened coconut.
Gently spread the topping over the jam.
Bake 20 minutes until the top puffs and starts to brown at the edges, let cool completely before cutting into squares.
Related Posts with Thumbnails