Wednesday, June 29, 2011

Flower Power - How to make giant tissue paper blooms


Summers officially here and I'm thrilled to be spending my Friday afternoons running the DIY- Make it here, take it there, teen program at our local library.


Last week was our first Friday and I was happy to see familiar faces from last year (a couple of whom are now college kids) along with newcomers. This tissue paper flower project was a huge success, easy enough that everyone felt confident and dove right in.


 Before you pull out the tissue paper the first step is it twist plastic beads onto either end of three - 4" wire lengths.


I used the Toner Fun wire I had on hand, you could easily substitute a lightweight 22 or 24 gauge floral wire. Be sure to save your scissors and use wire cutters to cut the wire lengths. When you fold the three wires in half they'll create a six bead flower center. Set them aside until you're ready to assemble the flower.


Tissue usually paper comes in 24" x 36" inch sheets. Stack four different colored sheets together, fold them in half and then in half again. This will give you four sets of quarter sized sheets. Each flower takes a single stack of four sheets. I pre-cut the tissue paper but encouraged the teens to mix and match the sheets to create their own color combinations. Starting on the narrow edge, fold up the bottom edge and then accordion fold the remaining length. It's just like making a fan, back and forth, creasing each new fold line.


Fold down the top inch and half of a 20 gauge fabric covered floral stem and then trap the centers of the three wire stamens and the folded paper in the bent wire. Twist the wire end around itself under the paper. If the paper is loose enough to wiggle free, twist it a couple more time to tighten the loop.


Twist the base of the wire stamens a couple times so that they stand erect. The next step is to select what shape to cut on either end of the fan. Each of the following three cuts create a different shaped petal and flower. Making one and half inch slits into spaced a quarter inch apart will create pompom carnation like flowers.


Making a v shape will yield a pointed lily petals.


A rounded n shaped end will produce a standard rounded petal.


Once you've cut your petal shape, gently spread open either side of the fan.


Starting in the middle closest to the stamens, pull one layer of petals up to the center of the flower. Slowly bring each tissue paper layer up behind the layer before it.


Once you've separated the tissue paper petals on one side repeat the process with the other side


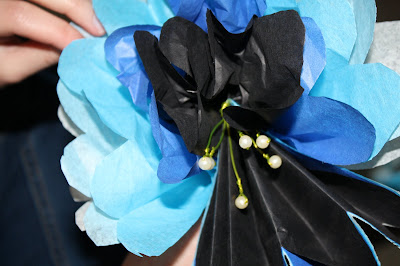
Here's a lily that is blooming with color!


I loved watching the tables filling up with colorful blooms! Don't hesitate to try this with younger children or even adults. It's a great project to liven up a rainy summer day.


Friday, June 24, 2011

Rainsticks!


Watch these creative kids turn a paper tube into a beautiful instrument during my first 'One World, Many Stories' craft workshop at Curtis Memorial library. Rainsticks originated from Chile and are traditionally made with dried cactus that are spiked with thorns or small nails. Our rainsticks are child friendly and recycle paper tubes!


This was a bring your own paper tube activity. We found that rigid tubes work best and you get a more interesting rainfall sound from gift wrap length tubes.


The wonderful librarians assembled the necessary materials for each tube:
Aluminum foil (cut to the length of the tube).
1/3 cup of rice
2 rubber bands
Colored paper tape
Adhesive gems
5" x 5" wax paper and packing paper squares
Colorful yarn scraps

Some friends brought super long tubes!

We cut a length of foil to match the length of each tube. It was up to the kids and their parents to cut the foil lengthwise into three equal strips. The strips are crunched and then slid into the tube. Their purpose is to slow the traveling rice and resonate it's sound. If the foil is crunched too tightly they don't slow the rice and if they're left too wide the rice can't travel freely from one end of the tube to the other.

 Perfect crunching technique!

The next step is to decorate the paper tube with paper tape strips.

Sometimes little fingers need a little help.

We intentional purchased an assortment of sizes so thinner tape can be placed over thick tape.

In case you haven't had first hand experience, kids love tape!

Adhesive gemstones were applied to the blank areas (Oriental trading is a great source to buy these in bulk).

We supplied colorful yarn to over wrap the rubber bands.

Lay the paper square over the wax paper square and center it over the top of one of the ends. Use a rubber band to tightly wrap the paper over the top of the tube.We had colored yarn available to over wrap the rubber bands.


The rice was premeasured in 3oz paper cups, for easy pouring into the tube. Once you have one end covered you can pour in the rice.


Add a second paper covering over the end of the tube. Once the ends are secure you're ready to invert your rainstick and listen to the gentle sounds of pouring 'rain'.

Shoulder strap anyone?
I'm starting think my library workshops are all powerful, it's been drizzling for two days now and there's no end in sight for the weekend.

Serious last minute adjustments.

If you missed this workshop (it maxed out at a hundred preregistered children) I'll be doing it again at the Freeport library on July 19th. Please be sure to call in a reservation.

His rainstick is taller than he is and check out that tassel!
Related Posts with Thumbnails