Saturday, July 17, 2010

Teens flip for flops: free tutorial!


This is the time to hit summer sales and stock up on flip flops, you can pick up a pair for a dollar or two! They're so many ways to craft them into something spectacular. I did a web search and found a plethora of ideas: from tying water balloons and fabric strips around the straps to applying rhinestones buttons and beads. I loved the inspiration but the reality is we live in Maine and one soggy downpour would completely destroy fabric or feathered footwear. I also wanted to avoid eating up my DIY workshop budget with toxic glue to attach embellishments. I had both a bucket of wood beads and roll of hemp in my studio and decided to simply try wrapping the hemp around the plastic straps to give the flip flops a natural look. I was thrilled with the results, the hemp 'grabbed' the plastic and stayed in place without needing glue.

The group of 15 teens loved the project, it took seconds to explain: provided well over an hour of entertainment, an opportunity for personal expression, and countless days of wearing enjoyment!

Materials
Assorted wood and shell beads, be sure to select beads with large enough holes to accommodate the hemp.
The flat shell beads are Natural Elegance from Blue Moon beads, the patterned wood beads are JoAnn Fabric brand.
Roll of narrow hemp, usually used to make thin macrame jewelry, if you have a group of more than ten people I'd suggest picking up a second roll.


Start by cutting a three yards length of hemp of the roll. Tie one end around the base of the strap and then begin tightly wrapping the hemp up strap, be sure to catch the end in your wraps.


String a bead onto the hemp and slide it down the cord, position it on the top side of the strap. This takes a second to check, it's easy to mistakenly position the beads on the inside especially at the strap base. Make sure you wrap the cord several times around the strap after each bead addition.


When you reach the end of the cord tie it around to the last wrap on the underside of the strap. When you add a new strand make sure to cover both the new and old hemp ends in your wraps.You can always use a darning needle to slip an end under existing wraps.


Once you hit the center of the strap you'll need to make additional wraps on either side of the toe strap.


It takes two to three strands of hemp to get around each flip flop depending on the size of the shoe, beads and tightness of the wraps. Follow the directions above to start or end new strands. Once you start your second flip flop you'll be a pro!


I loved watching how differently each of the flip flops turned out. Many thanks to the creative teens at Curtis Memorial Library that let me photograph their hands in action.

Thursday, July 8, 2010

How To: Summer Earrings!

Last week a made a fresh batch of lightweight summer earrings with a great group of teenagers. I chose ornate findings and a simple jump ring assembly.  My hope was that the girls would be successful and enthusiastic about exploring new jewelry techniques. In the past I've had trouble teaching groups how to turn and wrap headpins, I carefully chose this project avoid that problem. Earrings make great inexpensive bead projects for large groups as they use significantly less beads than bracelets and earrings. The girls were thrilled to be working with 'real' materials, and were delighted with their finished pieces. My only regret was that I couldn't scrounge up enough pliers for each girl to have two pairs.

The moms were equally excited about this project and I wouldn't be surprised if some of the earrings ended up in their jewelry boxes. In fact I ran into a librarian already wearing my sample yesterday! Please follow the directions below to whip up a pair to match your summer wardrobe.


Materials
Blue Earrings - Laser cut metal earring components with ear wires, Natural Elegance, Blue Moon Beads
Red Earrings - Elongated hoops, Natural Elegance, Blue Moon beads you'll need to purchase the earwires separately and connect them to the hoops.
6mm jump rings
Blue and red seed beads - Global nomad, Blue Moon Beads (these are actually larger than traditional seed beads I think of them as 'e' beads)
2 silver sequins
Optional - Aleene's Metal Jewelry Glue

Tools
Chain nose and bent nose pliers


The trick to opening jump rings is to hold a pair of pliers in each hand, then use them to grasp the wire end on either side of the split. Gently open the ring laterally. If you simply spread them apart the ring will loose its shape. Hook the open ring through the finding, then string on an 'e' bead before closing the ring. Use both pliers to click the ring back into place. If the wires don't connect the thin metal finding can slip through the opening. Some of the girls found it helpful to add a drop of Metal Jewelry into the bead and slide the bead over the split. Repeat the process to add a bead ring to each of the openings in the finding. For added shine string a sequin behind the bead on the ring that hangs from the center of the finding.

Repeat the process to create a second earring, slide them on and enjoy!

I'm always grateful to Blue Moon for graciously supplying me with products for my designs, these were left in my stash from working on designs for my book Simply Beaded Bliss. Hopefully these findings or a similar alternate product are still available at your local retailer.

Monday, June 28, 2010

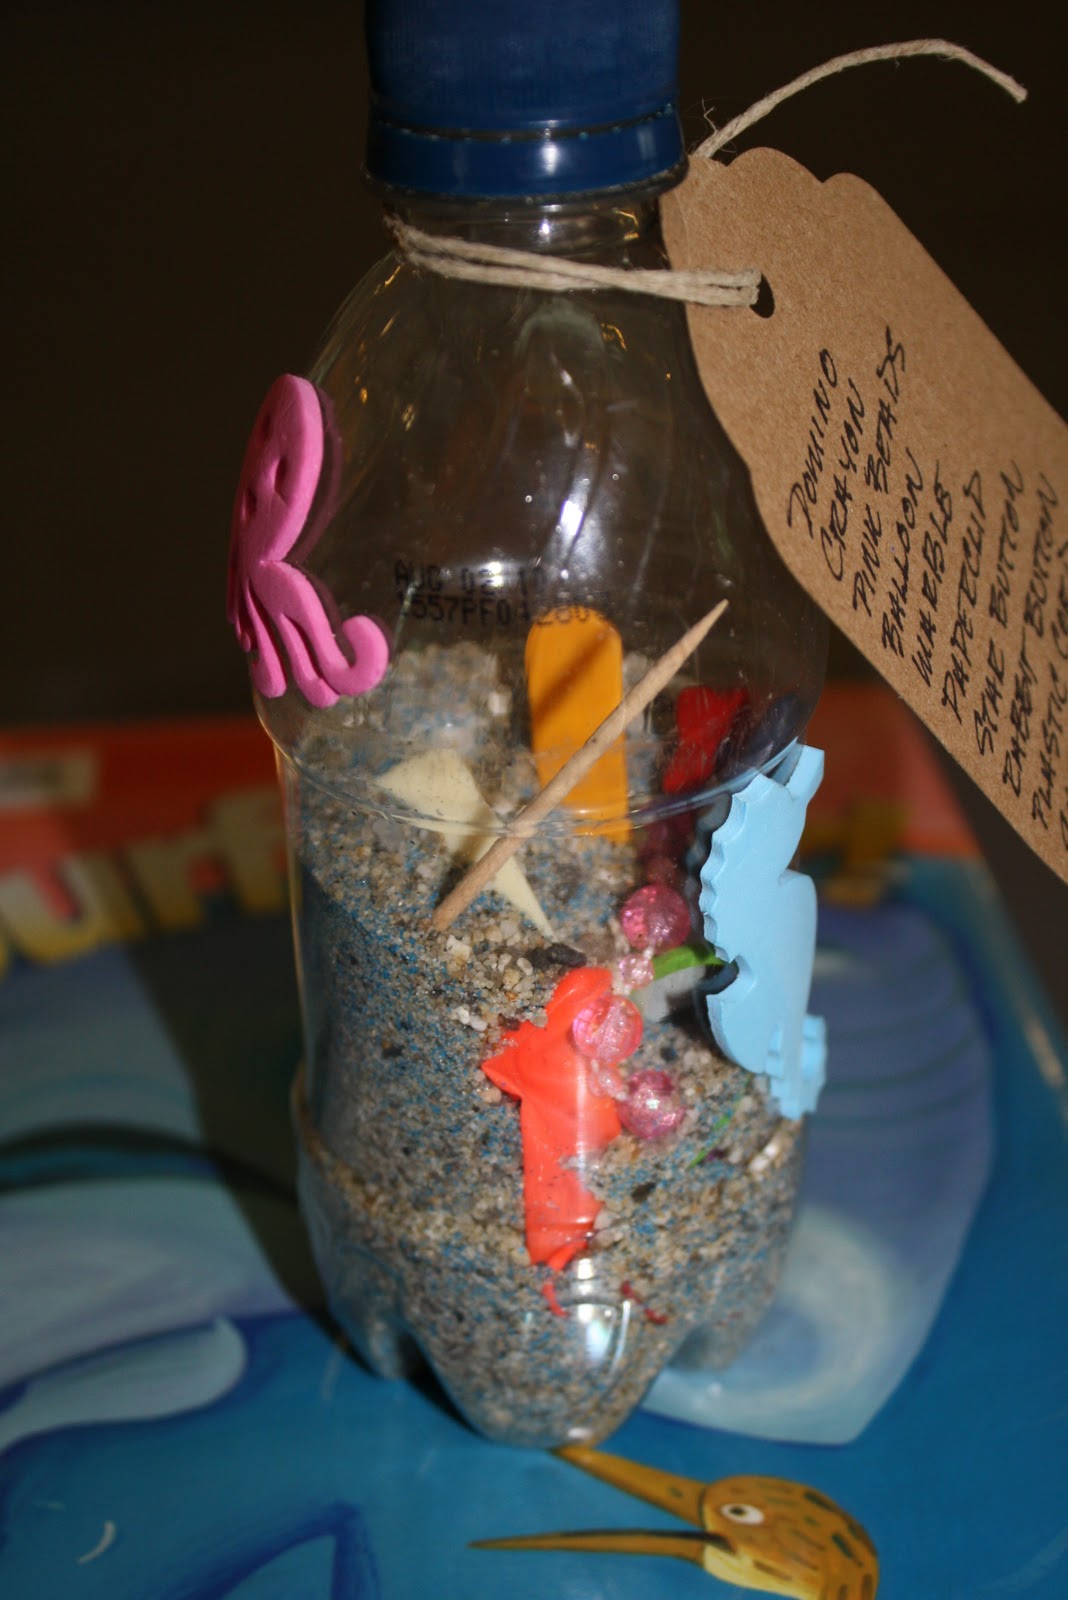
I SPY game bottles, rainy day craftiness.


After two weeks of drying out bags of sand I was anxious to make 'I Spy' bottles with my friends a the Curtis Memorial Library. A hundred children arrived ready to create with plastic bottles in hand. We began the event with a lively story entitled 'Surf War'. Next I acted out the steps and intentionally made mistakes to both entertain and keep the kids attention.

I had the children walk around the room collecting one of each of the objects. We had a great assortment of parts left over from our mosaic pot craft and added other inexpensive items that fit into the top of the bottle: paperclips, golf pencils, water balloons, puzzle pieces, beads, plastic figurines, buttons, marbles, toothpicks, plastic bugs, beans.

The next step was to write all the items on a check list. Fortunately, I was able to use reading program bookmarks and simply punch a hole in the top.

The children worked over big tubs to cover their items with sand. They continued to pour handfuls of sand into the bottles until they were 3/4 full.

We topped the plain sand with 1/2" of colored sand that we had on hand. Unfortunately we ran out of colored sand before all the bottles were complete. If  I was to do this project again I would invest in a couple bags of fine aquarium gravel. The colored sand was too fine, and the color was quickly lost in the regular 'play' sand. Our project needed to fit into the 'ocean' summer reading theme, but you could easily substitute rice.

Ocean themed foam stickers (JoAnn's) decorate the outside of the bottle, and a piece of ribbon attaches the content list around the neck. When your child is happy with their bottle the lid can be glue in place (Aleene's Tacky glue).

A great toy to keep in the car, simply rotate the bottle to rediscover the treasures hidden inside. Please see my home page for a listing of upcoming craft events.

Sunday, June 20, 2010

Imperfect Father's Day card brings Perfect Results!

a little typo my son discovered we actually met a decade earlier in '88.
I'd like to say that on Father's day morning I'd planned a perfect gift, that involved the enthusiastic participation of all three children. Unfortunately that wasn't the case. Instead I came downstairs with Celia in search of coffee and a plan. Time was on our side as it would take hours for the men in our house to wake up.

After enjoying coffee and sufficiently awaking to consciousness  I grabbed some white paper off the printer, a pencil, ball point pen, Crayola markers and a stapler. Celia is a willing accomplice in any card making activity. I folded two sheets of paper in half ripped them and then folded them again to make a miniature book. With pencil I sketched out my cartoon booklet. My rough idea was to make a quick cartoon story of our lives. I slimmed myself into a vixen for the falling in love page, and then devoted the subsequent three pages to each of our children. I showed them all as chubby babies holding their favorite baby toys. The final pages featured Jon as 'Super Hero Dad'. I added an ending note from our dog Maizy and credited 'Kitchen Table Publishing' on the back cover.

Celia and I packed our cards into an envelope and proceeded to make 'crispy' Belgium waffles and maple sausages. We made a room service delivery and Jon enjoyed his feast while watching our favorite CBS Sunday morning program. When he opened the card his eyes welled up and while paging through the book it was hard to tell whether he was laughing or crying (some of my stick figures were atrocious).


There's no way I would have been able to find a card that would be as touching as the silly one I made. I know it'll be added to the stack of handmade cards that we shared over our 22 years together. I still treasure the gorgeous cards Jon made me when we began dating.


It's not too late to make your dad or husband cry, get out markers and crayons and get busy! It doesn't need to be perfect, just heartfelt.

Friday, June 18, 2010

Fairy houses in the Maine woods

 
One of the joys of having children is the chance to relive the wonders of childhood. Building fairy houses with my daughter is a great escape from work and has brought fantasy and creativity to our playtime. We've developed a system first we select the spot usually at the base of a larger tree. Then I build the structure with large sticks while she collects shells bark twigs acorn caps and pinecones. She loves the role of interior designer selecting where the beds tables and swimming pools should be located. 
 
Our Botanical Garden two story fairy house.

We've started erecting a vail of the fairies to one side of our long driveway. That way we can keep an eye on the coming and goings of any animal visitors. Today's mission was to bring our house building talents to the 'Fairy Village' at Coastal Botanical Gardens in Boothbay. In preparation Celia loaded up her purse with sand dollars, oyster shells and a few pieces of sea glass. I had the more mundane task of packing food, bug spray and sunscreen.


Celia crouching to take a closer look at a small fairy house just inside the village gate.

After hanging our merchandise at the Botanical Market Fair we escaped down to wooded fairy village that sits in the shade alongside a tidal estuary, There's a child sized opening in the fence and a small sign with the following instructions.

Welcome to the Fairy Village 
Enjoy Building fairy homes, but please use only non living materials.
Yes : Pinecones, Bark on the ground, Sticks, Fallen leaves, Stones, Shells.
No : Moss and Lichen, Bark on trees, Tree branches, Leaves on trees, Mushrooms and Fungi, Ferns and other living plants.


The interior decorator placing her finishing touches on our creation.

What a joy to walk around all different kinds of structures, I especially loved a fairy treehouse that was built halfway up the trunk of a tree. There's also a huge pile of sticks with a 'gnome depot' sign.We had a great time building our home with a pine needle roof. Hopefully will get a chance to visit it again this summer. We're looking forward to making a ferry trip to Monhegan to experience their island fairy realm.


This impressive stone table sits at the base of the fairy village, if you look closely you'll see fairy houses behind it.

If you have children that are interested in Fairy houses I would highly recommend the Kristen's Fairy house book series and video recording. For adults there's a brand new book entitled Fairy Houses of Maine Coast filled with gorgeous photographs of fairy houses and the festival at the Botanical Gardens.

I will be selling my Mermaid and Fairy doll kits along with necklace pouches at Heritage Days Craft Fair in Bath over the July the fourth weekend.

Here's wishing you summer days filled with creative magic!

Friday, June 4, 2010

Painted Pebbles are Pet Rocks with Personality!


Crafts like fashion trends constantly recycle into new carnations. Pet rocks were a fad when I was child although I don't remember them being particularly colorful or fun to make. I've decided to bring a new breed of pet rock to the Brunswick Maine this summer. I'm loading up buckets of beach rocks to bring into the library so that creative youngsters can transform them into in vibrant sea creatures.
 My four year old assistant officially tested the project and gives is a double thumbs up painting three rocks, and asking for more the next day.

This craft will be the first of my six free Monday morning craft workshops for kids, a part of Curtis Memorial Library 'Make a Splash, Read!' summer programming.  Please pre-register for this 10:30 am June 21st event with the childrens desk starting 6/7. Proceeds from the book sale at the junior high helps support children and teen programs so be sure to hit up the sale June 25-27.
These are my rocks after one and a half coats of paint.

If you're unable to join us at the library there's no reason that you can't have a rock painting party of your own. All you need is a rock, acrylic paint, paint brush, some plastic eyes, Aleene's metal jewelery glue, and Krylon Waterproof spray sealer to keep your rock in high shine. Make sure you wash your brush between colors and dry it on a paper towel. While painting my test rocks I discovered that a low moisture acrylic paint would dry faster and require less coats. I've received some great 'facebook' suggestions for an alternative brand of paint and am currently on the hunt for Patio Paints to see if they'll do the trick in a single coat.

 This a combination of both our creations, you can see that there's no wrong way to paint a rock or make a pet!

Once the paint has dried, glue on the eyes and let the glue set. Adults should spray the rocks in a well ventilated area, use a paper towel to quickly remove the spray film from the plastic eyes.

Tuesday, June 1, 2010

DIY carpet sample flooring

 Heidi and Jon's weekend 'free' carpet installation.
Jon's offices are moving to a new location in Portland which means they've been purging stock piles of old product samples. He works for an architectural firm that specializes in 'Environments for Health' hospital and assisted living facilities. Part of their client services is to offer custom tailored interior boards that feature flooring, wall coverings, paint and trim samples. Instead of unloading the leftover commercial carpet samples he brought them home with a Memorial Day weekend den remodel in mind.
Commercial carpet samples have heavyweight rubber backing, making them ideal for high traffic areas.
Since the day we moved into this home we've loathed the dark blue shaggy nylon carpet in our TV room. Six years later we were still living with it. The one redeeming quality is that it hid the kids and dogs spills and messes. On the other hand the navy color showed every stray thread and fiber from my sewing and felting projects.
 You can change the appearance of two of the same patterned titles by simply orienting them in a different direction.
The worst part of this project was discovering that the floor underlayment needed replacing under the old carpet pad. Once we got through taking it out and installing a new one, the actual placement of the tiles was quick and easy. I camped out on the floor sticking the two foot square tiles in place with a double sided flooring tape (easily found at a hardware store). Jon devised an effective cutting strategy, he clamped either end of the carpet square between a straight cutting edge and cutting board. This secured the tile so that it stayed in place while he trimmed it to size with a utility knife. We worked from one side of the room, one row at a time across to the other side. If necessary it'll be easy to pull up a square and replace it with a new one. It took two hours to cover our 10.8 x 11.8 room.
The purple paint went on the night before it's Martha Stewart 'Lavendar Verbena' and works well with the yellow, orange, and aqua colors in the adjoining rooms. What brought me the most satisfaction was finally printing Celia's baby pictures and getting then up on the walls alongside her brothers. We missed a day on the beach and in the workshop working on lobsters but it was nice to relax on the couch and enjoy the room watching Shrek with Celia.
Please check out my book Craftcycle for more recycled home decorating ideas.
Related Posts with Thumbnails