Monday, February 28, 2011

Dog Gone Fun - Toy tutorial and Beefy biscuit recipe

I'll admit I'm dog crazy, can't imagine my days without four paws by my side.


Just before the holidays we bid a teary goodbye to our ten year old wheaten terrier, Maizy. She was my faithful companion and an expert nanny dog. She was the inspiration behind my second book, Pet Crafts. She left us far too young but will be treasured in family memories.


We picked up Otto at the begining of the new year. He's a spring loaded mini aussie whose filling our days with love and laughter. Our five year old daughter is having a great time helping with all things puppy from training to bathing.


Puppy toys and upscale treats can be pricey, you'll be amazed how easy and inexpensive it is to make and bake your own. Over winter break Celia devoted an hour making Otto a crazy furry critter. 


He immediately pounced on the crackling body and attacked the squeaky tail. This unique toy features a long Velcro body opening so that you can replace the crinkly water bottle stuffing.


You'll need the following supplies: fun fur and felt scraps,
fiber fill stuffing,
sew-on hook and loop fastener 
a squeaker , you can recycle one from an old toy or order them online.

Fold the tail fur in half and cut through both layers to make a pointed tail shape that is  12" long, 5" at it's widest halfway down the tail, and 3.5" wide at the base. Cut the body fur into a 11" wide x 12" long rectangle; which should be wide enough to wrap around a large sized water bottle. Then cut a circle that is 4" in diameter for the head. Finally cut two pairs of 1.5" high and 1.5" wide felt ears, a 1.5" wide nose, and two .75" circle eyes.


Place the right sides of the tail together and machine stitch around the outside edge, be sure to leave the base unsewn. Make a second reinforcing seam. Snip off the very tip of the tail and turn the fabric right side out.


Lightly fill the tail with stuffing, then insert the squeaker.


Stack the ears together and stitch around the outside edge leaving the base unsewn, then turn them right side out. Position the eyes and nose in the center of head and spiral stitch them in place. Place the ears point sides down over the face and stitch them to the edge of the head.


Placing right sides together stitch the bottom edge of the body rectangle to the head. The body piece should overlap by an inch and half to enable the loop and closure to work.


Reach inside and turn over a half an inch of the cut fabric edge down the length of the body. Machine stitch a single seam to finish the folded edge.


Insert the tail into the base of the critter. Make sure that the unfinished body edge overlaps the finished one. Stitch through all the layers to close the base and attach the tail.
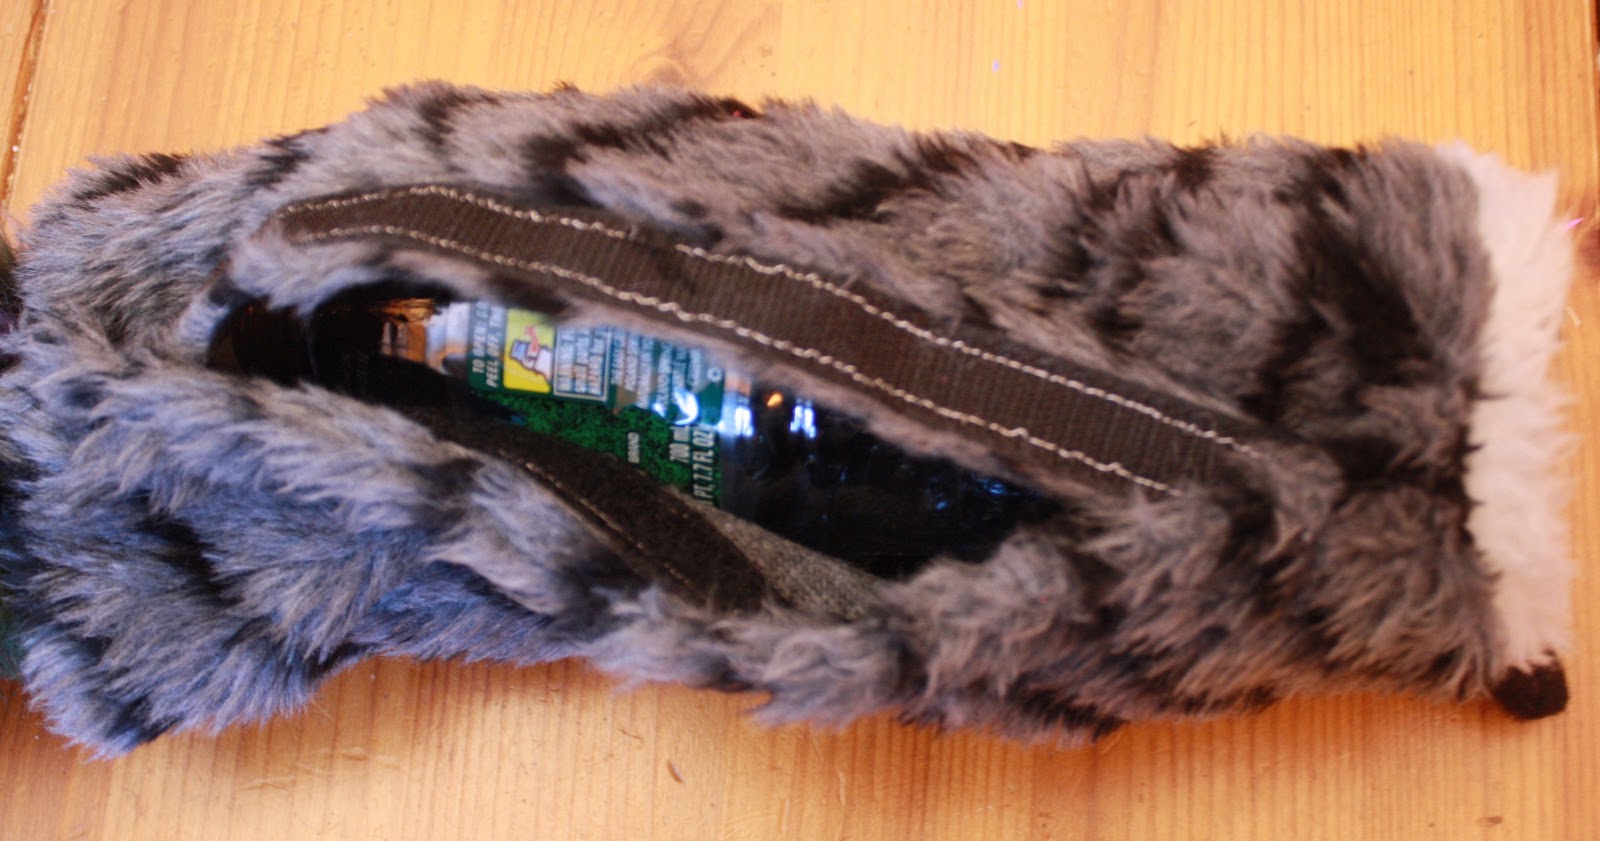

Turn the critter right side out. Pin and sew 10.5" length of hook and loop closure to the top of the unfinished edge and the underside of the finished edge. Insert the the bottle and let the games begin! A word of caution please be aware of your animals chewing habits and do not leave them unsupervised while they play.


When your pup slows down for a snack here's a biscuit recipe that will make them sit and beg.


Beefy Dog Biscuits

Preheat the oven to 300 degrees

In a large bowl/or stand mixer combine: 1/4 cup instant milk powder 
 1 T garlic Powder
1/2 cup cornmeal
1/2 cup wheat germ
1 cup oatmeal
2 1/2 cups flour

In a pryex measuring cup:  Dissolve two beef bouillon cubes in 1 1/2 cups of boiling water
Add 1 T of Peanut butter and drizzled in some honey.

Pour the wet ingredients into the dry ingredients and mix well.  Roll the dough to a 1/4" - 1/2" thickness on a floured work surface. We use a snowflake or flower shaped cookie cutter so that we can break off small pieces for training or stuffing into Kongs. Bake for 45 mins. then turn off the heat and leave the cookies to cool and harden in the oven for 10 hrs. Store in an airtight container. This recipe makes a generous cookie supply that lasts us almost a month.

Wednesday, February 9, 2011

Tweet Sachet tutorial


The woods surrounding our Maine home are covered in a dense quilt of snow. The early mornings are especially quiet, if it wasn't for the sounds of the woodpeckers and chickadees I'd be convinced that the whole world was sleeping. The last few morning robins have covered our crab apple tree filling their bellies with fruit. I'm hoping these red breasted birds are a harbinger of warmer temperatures and birdsong to come.


Just after the holidays a local patron had asked me to make a couple of the bird sachets that I had stocked over the holiday fair season. She was willing to wait until I'd wrapped up the copy and illustrations for my latest book 'Stitched Whimsy'. I finally delivered the finished sachets this morning, just in time for her to mail them as Valentine gifts. I took photographs while I made them so I could share the instructions with you.


You'll need scraps of muslin and cotton. Use a cutting mat, clear rule and rotary cutter to cut a 7 1/4" x 4 3/4" rectangle of muslin for the front and the same sized printed cotton for the back. While you're set up go ahead and cut multiples. When you're in stamping mode you'll be happy to have a stack of muslin ready for printing.


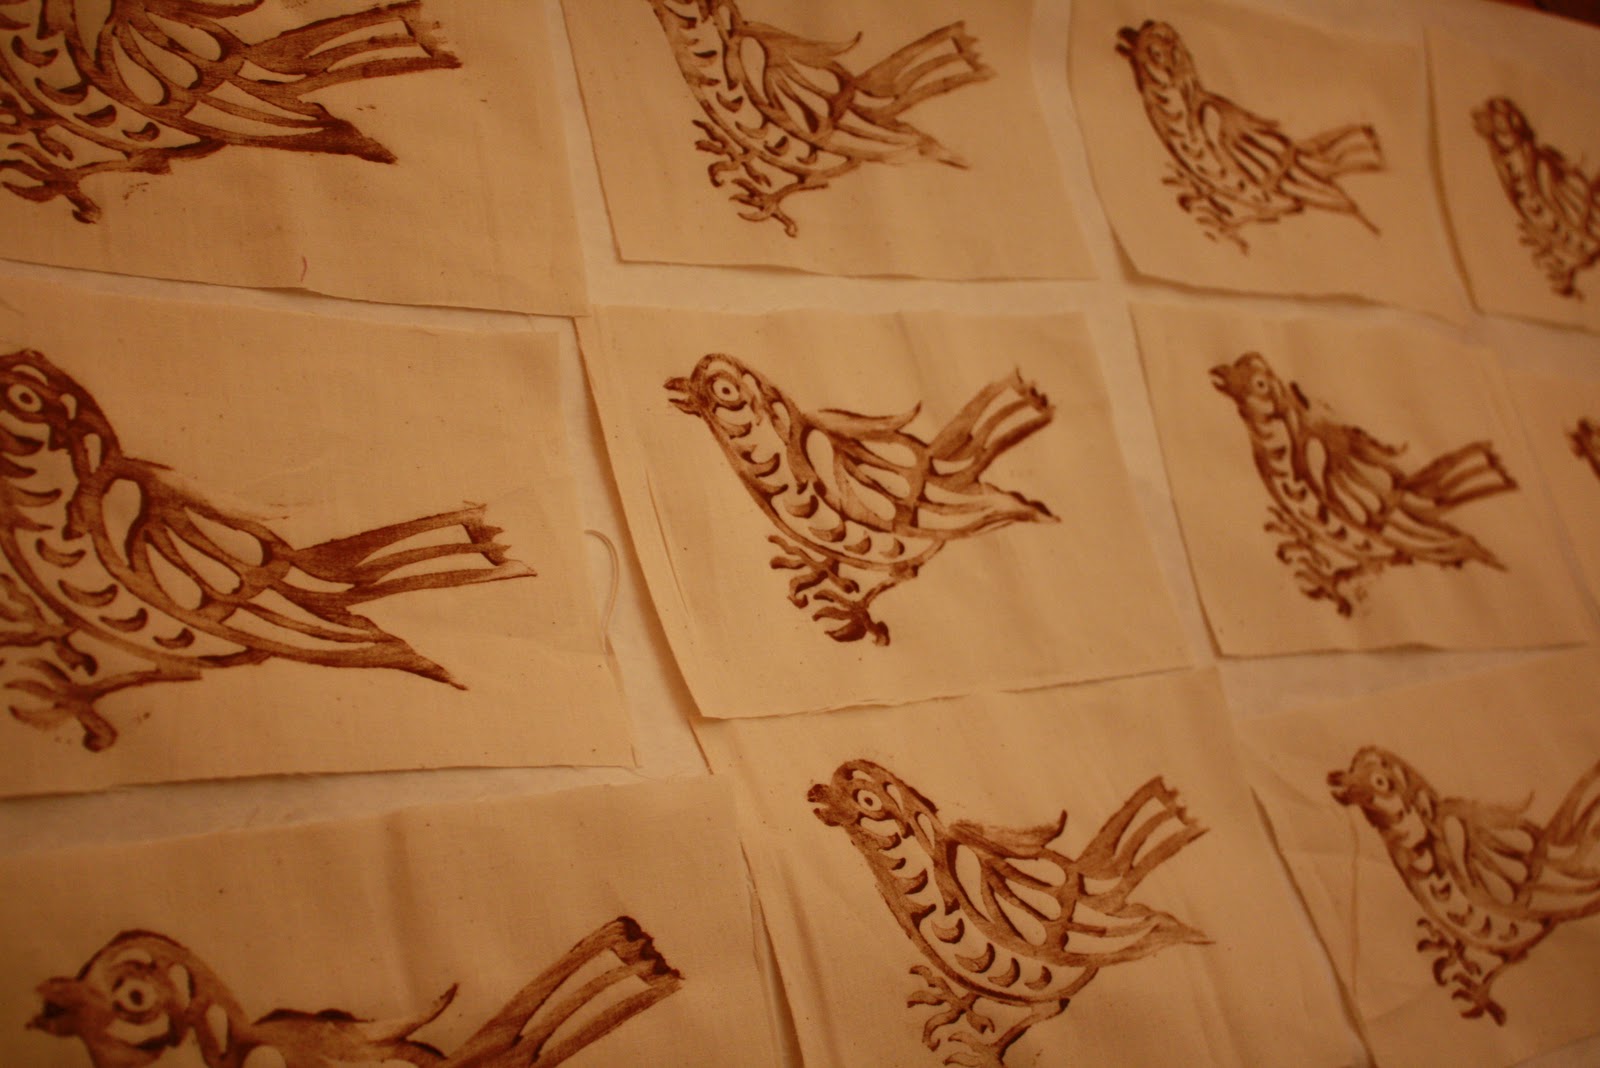
Cover your work surface and mix up Simple Spray (Duncan) fabric paint with brown acrylic paint. I find the loose liquid of the simple spray dilutes acrylic and helps the fabric absorb the paint. Brush the mixed paint onto the fabric stamp. I purchased this gorgeous hand carved wood stamp from Nest, its a fair trade product that is also available online at Connected. Match your brushstrokes to the form of the stamp. I started at the head and worked my way down the body increasing the length of the stroke on the wings and tail.


I found that laying the fabric over the painted stamp works better than conventional stamping. Rub your fingers over the entire surface of the fabric covered stamp. If you prefer to press the stamp down onto the fabric, layer a folded old towel under the muslin. The padding will allow you to press down on the stamp and push more paint into the muslin. 


Allow the printed fabric to dry before continuing.


Placing right sides together pin the printed muslin to the printed fabric backing.


Align the outside edge with your presser foot and machine stitch around the outside of the sachet. Leave a one inch opening to turn the sachet right side out.


Trim away any excess fabric and clip the corners.


Turn  the sachet right side out, using a stuffing stick or knitting needle to push out the corners. 


Pour a cup of dried herbs into the opening. I used a 1/2 cup each of Balsam and Lavender over the holidays. I filled this new batch sachets with a cup of lavender. It's time for me to place a new order at San Fransisco Herb Co. and experiment with spring and summer scents. Tuck the raw edges of the opening into the sachet so it matches the seamed edges on either side. Instead of hand stitching the opening closed I machine stitch a second top stitched seam around the edge of the stuffed sachet. The opening will be stitched closed in this seam.


Hand stitch cut felt leaves and wooden beads by the foot of the bird. You'll be happy that you cut and stamped extra birds, this sweet sachet makes a great gift. It's too pretty to hide in a drawer enjoy it out in the open until spring arrives. If you're not in the mood to whip a sewing project I'll be stocking these sachets in my brand new Etsy Store.

Tuesday, December 14, 2010

Holiday Craftiness - Simple Gifts


This weekend I had the pleasure of crafting with some wonderful teens at our local library. I planned three quick and easy projects that used materials I had on hand to keep costs down. We made wreath ornaments, lavender sachets and beaded choker pendants. The girls were thrilled with their creations and had friends and family in mind for each gift.


Crafting wreath ornaments was a great way to work through my giant bag of scraps. You'll also need to gather: 18 gauge galvanized steel wire (hardware store), jingle bells, scissors, pliers and wire cutters. Start by cutting the scraps into 'uniform' one inch square pieces. Fold each piece in half and clip a small slit along the fold line.


Once you've prepared enough pieces String them onto a 14" length of wire. Continue stringing until you have enough felt to encircle a wreath. String a jingle bell and/or two felt holly leaves onto one of the wires.


Bend the wires at a ninety degree angle where they meet at the top of the wreath. Coil one wire end around the other, use wire cutters to trim the coiled wire end. Use pliers to form the other end into a large open spiral hanger. Give your wreath a hair cut, use scissors to trim away stray felt ends.


This simple beaded choker pendant was a very successful group beading project. Making a beaded pendant is just like making one half of an earring set. It also allows you to showcase one of a kind beads. Rubber Silkies necklace cords are my favorite new beading supply. They're manufactured by Pepperrell and are sold at our local JoAnn's fabric store. The smooth rubber clasp is built into the cord and is very comfortable to wear.


I purchased a bulk bag of glass beads and divided them in bowls for easy selection. You'll also need small bead caps, head pins, round nose pliers, and wire cutters.


Simply string three beads onto the head pin, add a bead cap into the mix if you want to highlight a bead or narrow the opening of a large bead. Use round nose pliers to turn the end of the head pin into a loop. Open the loop laterally and then slide it onto the center of the cord. Be careful you don't pinch the rubber in your pliers as it breaks apart when squeezed with metal. Use the pliers to carefully close the loop back to it's original shape.


These sweet little lavender sachets scented the room as we crafted. You could easily substitute great smelling Balsam or make use the fabric pouch as a small gift bag. You'll need two different colors of purple fabric, straight pins, lavender buds (San Fransisco herb Company), thread, hemp cord, card stock labels (I cut my with my Sizzix Big Kick), stamps, chalk ink pad, black pen.


Cut the fabric into 4" x 7" rectangles, placing right sides together stack one color over. Pin the two layers of fabric together. Because I had a nice small group I was able to help each girl machine stitch three sides of the fabric together. For many of the girls it was the first time they'd used a sewing machine. Trim the top off the bag with pinking sheers then clip the extra fabric off the corners with regular scissors.


Turn the fabric right side out and used a pencil point to push out the corners. Pour a half cup of lavender buds into the sachet.


Stamp and write messages onto the tags before tying them around the top of the sachet with a section of hemp cord.

Fa la la la la ...Crafty girls with their creations!

Wednesday, November 24, 2010

Felt the Halls with Wooly Garlands!


The holidays are officially here and it's time to get your crafty self into action! Forget about stringing popcorn and cranberries this up-cycled wool garland project will add warmth and color to your home all winter long.


Over the last year I've been saving my wool and felt scraps from plushie making. I regularly use my stash for bird beaks, wings, leaves and flowers. However the bags get larger each day and I needed to find a craft that uses entire color selection in their existing shapes. I found inspiration at my neighbors home, she has gorgeous handmade wool garlands hanging around the door ways and windows of her home.


I turned up an over sized darning needle, some cording, and a collection of large wooden beads in my studio.  Then moved the bags of scraps to the floor of our television room. The first step is to tie an overhand knot at the end of your of cording. The length of the cording is dependent on where you want to hang the garland and how much time you have. The next step is to slide a wood bead on to the cord so it rests against the knot, it'll prevent the felt pieces from falling off.


Now you're ready to begin stringing the length of your garland.  Simply slide the 2" by 1" scraps onto the needle. I folded my long strips in half and drew the needle up through both layers.


I quickly discovered that felted sweater scraps effortlessly slid over the needle whereas the tight weave of the brightly colored commercial felt from Commonwealth Felt was a struggle. My solution was to fold the felt and snip a single cut into the center of the piece, then unfold and string the needle through the cuts.


I'm drawn to random color stringing when I bead, it was automatic for me to distribute colors and textures along the length of the garland. Custom stringing garlands to match your decor is as simple as sticking to a limited color pattern or grouping like colors together. To break up the monotony of the stringing I periodically added beads a felt flowers to the strand.


I had grand plans of making loads of long garlands for craft sales. The results are beautiful but they took twice the time than I estimated. I stopped at five 55" long garlands and still have piles of scraps left to use. If you don't want to commit to making a whole garland consider adapting this project to make a fun scarf. For comfort I'd suggest omitting the beads and using strong yarn as your stringing material.

My book Craftcycle features projects that use felted sweaters and other recycled fabrics. For more crafty inspiration take advantage of twenty percent off your order and free download on Cyber Monday at Mycraftivity.com!
The Castle tote and matching puppets from Soft and Simple Knits for Little Ones is one of today's free download selections.

Wednesday, November 17, 2010

Home Studio Chaos

This time of year can throw any professional crafter into a tailspin, but add a December book deadline and craziness abounds. Here's a behind the scenes peek at what creativity looks like in my house.


My dining room sewing set up, the chairs become portable shelving. Note the paper bag full of scraps they're test patterns that didn't make the cut. It all needs to be cleaned up and put away before dinner, a necessity that helps keep me organized.


This morning I've been working on vintage dachshund, cat and deer patterns for my upcoming book 'Stitched Whimsy'. I'm stitching the prototypes with flannel and Minky. I have some wonderful vintage prints, fuzzy eco felt and corduroy ready to use on the final versions. My sewing machine is a little Bernina, a twenty year old wedding gift from my parents. No bells and whistles but it's a workhorse that's seen me through years of Better Homes and Gardens costume making.


The Hedgehog Softie I created for Stitched Whimsy worked out so well I've been making a few extra for the weekend fairs. Jon cut out eight sets of pattern pieces and I've been assembling them production style. These finished arms are ready to meet their bodies.


I do have actual studio space upstairs over the garage but I find it's easier to work down where the kids are. When life is busy, part of the studio becomes a dumping area. It's hard to tell but underneath this chaos is a treadmill that has been seeing very little action.


I have an awesome felt selection from Commonweath felt. I've been using their 100% wool 35% wool and bamboo felt in many of the designs for my upcomming book.


I separated my fabric collection into warm and cool colors. I owe a huge debt of gratittude to my sister for filling out the selection with wonderful prints she collected in NYC.


I'm not going to lie it's a thrill to paw through prints and felt to find the right combination for a design.


Decorative top stitching finds it way into many of my designs. I can't tell you how happy I was when this designer kit arrived from my friends at DMC.


After my little one goes to sleep I'm too brain dead to work on book designs, that's when I nestle into the couch with piles of busy work. These 'Little Hoots' are awaiting hand embroidery. They sell so well it's hard to keep them in stock. I'm contemplating adding the pattern to my book...


More late night busy work these birds of a sweater first seen in Craftcycle are in need of wings and legs they're stationed by the television remote. Despite my creative stash I still make weekly runs to JoAnn's for missing items. At the top of this weeks list - more stuffing! Here's wishing you a happy holiday season filled with creativity.
Related Posts with Thumbnails