Monday, March 14, 2011

Hedgehogs: Needle Felting Tutorial


Last Friday I had the pleasure of crafting with some great teens. Needle felting is a simple accessible craft, if you can poke a needle you can needle felt. Only two of the participants were experienced needle-felters but everyone was very successful.


Hedgehogs are surprisingly popular in our northern porcupine country. Their shape makes them the perfect beginner project. I've been needle-felting lots of critters for my new book project Stitched Whimsy.  In the process I've realized the importance of chenille skeletons that form a sturdy flexibility core under the wool roving. In this case the wire allows you to raise and lower the hedgie's nose. The first step is to fold the chenille stem in half and trap a thin pinch of roving in the fold. I use inexpensive wool mill scraps for the foundation of all my felted creations.


Form the chenille stem ends into two loops, twist the wire ends around the base of the loops. Interlock the two loops together to create a framework for the body.


Tightly wrap the roving around the folded chenille stem to create the nose and head. Working over a foam matt or section of rigid foam insulation poke the roving on all sides with a felting needle. A felting needle has tiny barbs that catch the individual wool fibers and knit them together, the more you poke the more the fibers are compressed.


Fill the chenille frame with roving and then over wrap the body with additional base roving. Needle-felt the roving on all sides to compress the fibers and solidify the body.


Cover the base color with brown roving, switch directions as if you were winding a skein of yarn. The combination of overwrapping and needle felting will tighten the body. Wrap the head and nose in beige roving and needle-felt in place.


Roll tiny pinches of colored roving to make the eyes and nose. Needle felt these small pieces directly into the beige head. Spiral slightly larger pinches of beige roving and needle-felt them on the matt/board before felting the bottom edges to either side of the head.


The flower embellishment is made by spiraling a piece of roving into a circle and felting it just behind an ear. Pull strands into the center to form petals. I added a touch of green roving for a small leaf accent.


This lucky critter was given a stylish purple top hat.


Three top tables and coffee tables made for cozy crafting. The bags of roving are from my favorite needle felting supplier Portland Fiber Company, on Congress Street in Portland.


As always my projects are open to adaptation, it was fascinating to observe the creation of this weasel.


One of the participents came late and skipped on the chenille stem step she made an adorable mashed potato pair.


So happy our amazing teen librarian was able to leave the desk and join the fun. I was also surprised to have crafty friends join me all the way from Standish.


We had a rare albino hedgehog sighting and a camera shy multi-colored tie dye hedgie.


Don't stop at just one, they're happier in pairs!

Sunday, March 6, 2011

Winter Break Snow Globes: a tutorial


This crafter doesn't need glitter to shine.

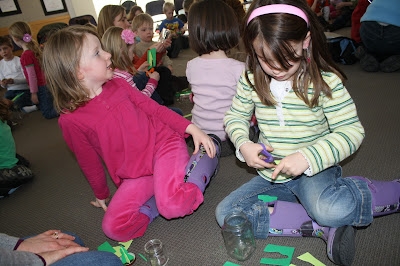
While the rest of the country might be seeing signs of Spring, Maine is still under a heavy blanket of snow. Last week the kids were home for winter break. A school holiday invented to slow the spread of colds and flu, give students and teachers a break, while providing everyone a chance to enjoy winter sports. The library requested a craft and we quickly agreed that snow globes would be perfect. We were astounded by the turn out, approximately eighty children arrived with glass jars in hand!

Hope it passed the test!

I started the event with the perfect book The Snow Globe Family, by Jane O'Connor. It was my first time being miked for a library event, it worked well until I moved around for the room for the demo and unwillingly broadcasted ear piercing screeches.


Jane O'connors book about life inside a snow globe is a classic.

Most snow globe projects require a strong adhesive to attach a plastic object to the inside of the lid. This presents two problems, the library budget can't afford 80 plastic objects and children don't want to wait a day for the glue to dry before filling their globes with glitter and water.


Crafting with a crowd is exciting inspiring and also distracting!

I decided craft foam would be the perfect alternative, it's waterproof and easy for kids to cut. My best discovery was permanent Glue Dots, quick to distribute, mess free, and best of all they instantly held craft foam in place!


A creative participant added a wonderful polar bear to the scene

We supplied the children with two shades of green foam and scissors. I demonstrated how to cut out two tree shapes (that would fit inside your jar). Then I cut a slit halfway down the middle of one tree and halfway up the middle of the other tree.  Slide the two pieces together and you instantly have a three dimensional tree.


Test fit your tree before filling the jar, it's easy to give your tree a haircut if it's too tall or wide.


I had them place a glue dots inside the lid and press the base of the tree into the glue. Only a couple of trees sprang loose, to prevent this I'd suggest anchoring the sides of the trees with 1-2 additional dots.

Fill the glass jar to the first screw line with distilled water. Then squeeze in 5-7 drops of glycerin, which slows down the glitters movement in the water. Glycerin is sold with cake making supplies in craft stores but is less expensive in drugstores.


Initially the glitter floats on the top, once you screw on the lid and give it a shake the glitter is set into motion.


The favorite step was adding a spoonfuls of iridescent and light blue glitter. For a true snowy appearance I would recommend opaque white glitter. Glitter is the one ingredient that I should have double stocked, it's impossible to have too much!

Parents (and my two high school helpers) applied a bead of Silicon Aquarium Sealant (sold at pet stores) to the inside edge of the metal lid before screwing it in place. If you're making the project at home with the kids you could easily substitute a glass and metal glue.


We also provided white craft foam strips to wrap around the base of the jar. This covered the lids and gave the illusion of a snow bank. Glue dots were used to attach the overlapped ends.


No doubt about it, kinetic crafting is a hit!

I'll always wonder if our combined enthusiasm for snow ushered the ten inch storm that fell the next day. I'm already looking forward to planning a warmer craft for April break, maybe we can get flowers to bloom!


Isn't everything better with a bow on top?
Related Posts with Thumbnails